Candle Making Made Easy
Have you ever wanted to add a personal touch to your home decor? Crafting your own candles is a fun and rewarding way to do just that. Whether you’re looking for a relaxing hobby or a way to create unique gifts, this guide will show you how to get started with Candle Making.
One of the best parts of this craft is the ability to customize everything. From choosing the perfect scent to experimenting with colors and shapes, the possibilities are endless.
Plus, it’s a cost-effective way to fill your space with beautiful, handcrafted items.
At Candlewic, we’ve been providing high-quality supplies for over 50 years. Our customers love using our Apple Pie fragrance to create candles that smell just like a freshly baked dessert. With the right tools and a little creativity, you can achieve amazing results too.
In this guide, we’ll cover everything you need to know, from selecting the best wax types to adding the perfect scent. We’ll also share essential safety tips to ensure your crafting experience is both enjoyable and safe. Let’s dive in and start creating something beautiful!
Learn Basic Catholic Prayers: Essential Devotions for Faith.
Catholic Weddings: Timeless Traditions, Personalized Celebrations.
Why I Fell in Love with Candle Making
Discovering the art of crafting candles changed my perspective on creativity. What began as a simple hobby quickly turned into a passion. The first time I made a candle, I was amazed at how something so small could bring so much joy. It was a citrus-scented container candle, and it smelled incredible. That moment sparked a love for this craft that continues to grow.
One of the things I enjoy most is the therapeutic benefits. Pouring wax, choosing scents, and watching the process unfold is incredibly relaxing. It’s a creative outlet that helps me unwind after a long day. Plus, there’s something satisfying about making something with your own hands.
Another reason I fell in love with this craft is the cost savings. Homemade candles are much more affordable than luxury store-bought ones. For example, a high-end candle can cost $30 or more, but making your own allows you to create something just as beautiful for a fraction of the price.
Seasonal creations have also become a cherished tradition in my home. Every fall, I make soy candles with warm, cozy scents like apple pie and cinnamon. They’ve become a staple during the holidays, and my family looks forward to them every year.
“I made candles the first time and they were a HIT! I especially liked the Apple Pie!”
If you’re thinking about how to get started, I encourage you to take the leap. It’s a rewarding experience that combines creativity, relaxation, and practicality. Whether you’re making candles for yourself or as gifts, the process is worth the time and effort.
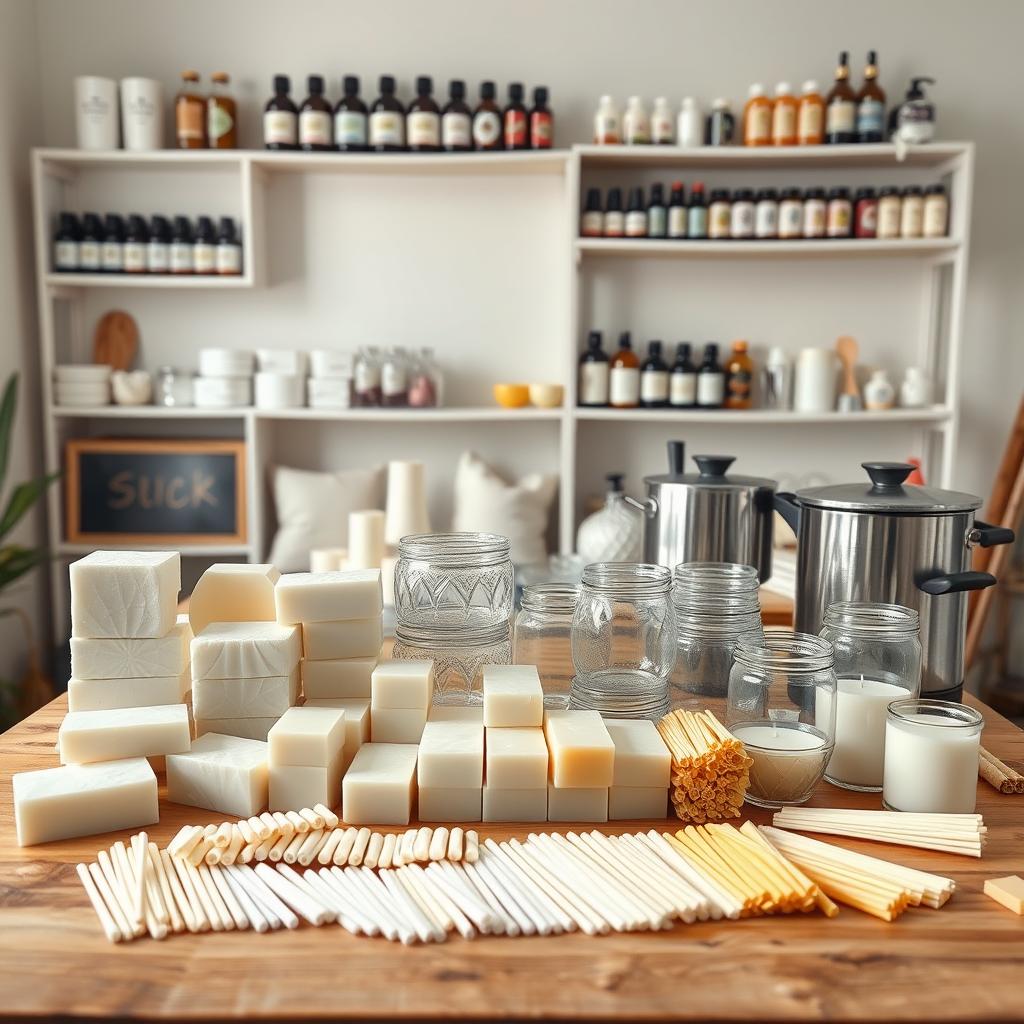
Candle Making Supplies You Can’t Skip
Every masterpiece begins with quality supplies. Whether you’re a beginner or a seasoned crafter, having the right tools ensures your project turns out just the way you envisioned. Let’s dive into the essentials you’ll need to get started.
Wax: The Heart of Your Candle
Wax is the foundation of any great project. It’s what gives your creation its structure and burn time. I’ve experimented with different types, like paraffin, soy, and beeswax, and each has its unique benefits. For example, soy wax is eco-friendly and has a great scent throw, while paraffin is known for its smooth finish.
One of my favorite options is Candlewic’s custom-granulated wax. It’s easy to work with and melts evenly, making it perfect for beginners. If you’re unsure where to start, soy wax is a versatile choice that works well for most projects.
Wicks: Choosing the Right Flame Carrier
Wicks play a crucial role in how your candle burns. I’ve found that zinc core wicks are ideal for container candles because they provide a steady flame. Cotton wicks are another popular option, offering a clean burn and minimal soot.
When selecting a wick, consider the size of your container and the type of wax you’re using. A wick that’s too small won’t melt the wax evenly, while one that’s too large can cause tunneling. It’s all about finding the perfect balance.

Fragrance Oils: Scent-sational Additions
Fragrance oils are what make your creation truly unique. I love experimenting with different scents to create candles that evoke specific moods. For a cozy vibe, I use warm notes like vanilla or cinnamon. For something fresh, citrus or lavender works wonders.
A pro tip: use 6-10% fragrance oil load for optimal scent throw. Too much oil can affect the burn time, while too little might leave your candle scentless. It’s all about finding the right balance to enhance your project.
Containers and Molds: Shape Your Vision
Containers and molds are where your creativity really shines. Glass jars with lids are a popular choice because they’re heat-resistant and visually appealing. I’ve also used metal tins for a more rustic look.
If you’re feeling adventurous, try silicone molds for unique shapes. They’re flexible and easy to use, making them perfect for intricate designs. Metal molds, on the other hand, are durable and long-lasting, ideal for repeated use.
With these essential supplies, you’re ready to bring your vision to life. Remember, the key to success is choosing quality materials that suit your project. Happy crafting!
How to Make Candles at Home: My Step-by-Step Process
Creating something beautiful at home has never been easier. With a few simple steps, you can craft stunning decor that adds warmth and charm to any space. Here’s my go-to process for achieving amazing results every time.
First, melt your wax to the right temperature. For soy wax, heat it to 185°F and let it cool to 125°F before pouring. This ensures a smooth finish and prevents overheating. Temperature control is key to success.
Next, add your fragrance oil. I use about 1 ounce per pound of wax for a strong scent throw. Stir gently to distribute the oil evenly. This step is where your creativity shines—choose scents that match your mood or season.

Once your wax is ready, prepare your containers. Secure the wick to the center using a wick sticker or hot glue. This ensures it stays in place while pouring. Proper wick placement is essential for an even burn.
Now, pour the wax slowly into your container. If you’re feeling adventurous, try the layering technique for an ombre effect. Pour one color, let it set slightly, then add another. The result is a stunning gradient that’s sure to impress.
After pouring, let your creation cure for at least 48 hours. This time allows the fragrance to fully develop, giving you a stronger scent throw. For a quicker set, you can use the freezer, but be cautious to avoid cracking.
Here’s a quick troubleshooting tip: If your wax cracks or the scent is weak, don’t panic. I once saved a peppermint batch by gently reheating and repouring. It’s all about experimenting and learning as you go.
- Heat wax to 185°F and cool to 125°F for smooth pouring.
- Use 1 ounce of fragrance oil per pound of wax for optimal scent.
- Let candles cure for 48 hours for the best fragrance throw.
- Try layering techniques for unique, ombre designs.
- Use the freezer for quick-setting, but handle with care.
With these techniques, you’ll be able to make candles that are both beautiful and functional. It’s a fun, rewarding way to add a personal touch to your home. Happy crafting!
Picking the Perfect Wax for Your Project
Choosing the right wax can make or break your project. The type you select affects everything from burn time to scent throw. With so many options available, it’s important to understand the differences and benefits of each.

Soy vs. Paraffin: Which Wins?
Soy wax and paraffin are two of the most popular types for container candles. Soy is eco-friendly and burns 30% longer, making it a favorite for those who value sustainability. It also has a great scent throw, perfect for scented candles.
Paraffin, on the other hand, is affordable and easy to use. It creates a smooth finish, but it’s derived from petroleum, which some crafters avoid. When deciding between the two, consider your priorities—longevity and eco-friendliness or cost and ease of use.
Specialty Waxes for Unique Textures
If you’re looking for something different, specialty waxes offer unique benefits. Coconut wax blends minimize frosting and have a creamy appearance. They’re ideal for creating a luxurious product with excellent scent throw.
Beeswax is another great option. It’s skin-safe and can be customized with dried flowers for a natural touch. Palm wax stands out with its crystalline patterns, adding visual texture to your creations. Rapeseed wax performs well in cold throw tests, making it a reliable choice for cooler environments.
- Soy wax burns longer and is eco-friendly.
- Paraffin is affordable and easy to work with.
- Coconut wax blends reduce frosting and enhance scent throw.
- Beeswax is skin-safe and customizable.
- Palm wax offers unique crystallization patterns.
By understanding the strengths of each type, you can choose the perfect wax for your next project. Whether you prioritize sustainability, cost, or unique textures, there’s an option that fits your needs.
Wick Wisdom: Size, Material, and Burn Time
The right wick can transform your project from ordinary to extraordinary. It’s not just about light; it’s about how well your creation burns and performs. Let’s dive into the essentials of wick selection and care.
First, consider the size. A wick that’s too small won’t create a full melt pool, while one that’s too large can cause excessive smoke. Use a burn rate chart to match the wick size to your container’s diameter. This ensures an even burn every time.

Material matters too. Cotton wicks are popular for their clean burn, while wooden wicks add a cozy crackling sound. Zinc core wicks are great for container projects because they stay upright and burn steadily. Experiment with different types to find what works best for your needs.
Trimming your wick is a simple trick for cleaner burns. Keep it at 1/4 inch before lighting to prevent soot and uneven flames. For wooden wicks, regular trimming helps avoid “mushrooming,” where the tip expands and affects performance.
Testing is key. Use small batch containers to try out wicks before committing to a full project. This DIY approach saves time and ensures you get the best results. Pay attention to how the wick width affects the fragrance throw—wider wicks create larger melt pools, enhancing the scent radius.
Finally, troubleshoot common issues. Tunneling happens when the wax doesn’t melt evenly, often due to a small wick. Drowning wicks occur when the wax pool overwhelms the flame, usually requiring a larger wick size. Fixing these problems ensures your project burns beautifully from start to finish.
With these tips, you’ll master the art of wick selection and care. It’s a small detail that makes a big difference in your craft. Happy creating!
Fragrance Oils vs. Essential Oils: What Works Best?
Finding the right scent for your project can be a game-changer. Whether you’re crafting for relaxation or gifting, the type of oil you choose plays a big role. Fragrance and essential oils each have their strengths, but understanding their differences helps you make the best choice.
Fragrance oils are designed for versatility. They work with all wax types and offer a strong scent throw, both cold and hot. Essential oils, on the other hand, are natural but can fade over time, especially citrus-based ones. If you’re aiming for longevity, fragrance oils are the way to go.

One of my favorite blends is the “Campfire Nights” scent profile. It combines smoky, woody, and sweet notes for a cozy vibe. Blending fragrance oils is easy and lets you create unique scents that stand out. Essential oils can be trickier to mix, and their natural properties may limit their performance.
To maximize scent longevity, store your product in UV-protected containers. This prevents sunlight from breaking down the fragrance. FDA regulations also guide how much fragrance oil you can use—typically 6-10% of the wax weight. This ensures safety and optimal performance.
- Fragrance oils offer better cold and hot throw performance.
- Essential oils, especially citrus, may fade over time.
- Blend fragrance oils for custom scents like “Campfire Nights.”
- Use UV-protected containers to preserve scent longevity.
- Follow FDA guidelines for fragrance load percentages.
By understanding these differences, you can choose the right oil for your needs. Whether you prefer the versatility of fragrance oils or the natural appeal of essential oils, the key is to experiment and find what works best for you.
Color Your World: DIY Candle Dye Techniques
Experimenting with dyes opens up a world of creative possibilities. Whether you’re aiming for bold, vibrant hues or soft, natural tones, the right color can elevate your project. Let’s explore the different types of colorants and how to use them effectively.
Liquid dyes are a popular choice for their precision. They allow you to create subtle shades or intense colors with ease. Powdered dyes, on the other hand, offer intense pigmentation but require careful measurement. Dye chips are pre-measured and convenient, though they’re less flexible for custom blends.

For those who prefer natural alternatives, turmeric and beetroot are great options. I’ve used turmeric to achieve a warm, golden hue and beetroot for a rich, pinkish tone. These natural dyes add a unique touch to your creations.
One of my favorite techniques is the layered ombre effect. Start by pouring one color, let it set slightly, then add another. The result is a stunning gradient that’s sure to impress. To prevent dye migration during cooling, work in a stable environment and avoid sudden temperature changes.
Metallic pigments can add a luxurious finish, but safety is key. Always follow manufacturer instructions and avoid inhaling fine particles. If you notice discoloration from fragrance interactions, try reducing the fragrance load or using dye stabilizers.
- Liquid dyes offer precise color control.
- Powdered dyes provide intense pigmentation.
- Natural alternatives like turmeric and beetroot add unique tones.
- Prevent dye migration by maintaining a stable environment.
- Use metallic pigments safely to avoid health risks.
“The right color can transform a simple project into a work of art.”
By mastering these techniques, you can create stunning, colorful creations that reflect your personal style. Whether you’re a beginner or an experienced crafter, experimenting with dyes is a fun and rewarding way to enhance your supplies and bring your vision to life.
Container Candles: Jars, Tins, and Beyond
Exploring unique containers can elevate your crafting experience. From classic jars to rustic tins, the options are endless. Each choice adds its own charm to your final product.
Glass jars are a popular pick for their heat resistance and elegant look. Candlewic offers sets in 4Oz and 8Oz sizes, perfect for bulk projects. They’re available in heights ranging from 3.0 to 12.0 inches, giving you plenty of flexibility.

If you’re feeling creative, try upcycling vintage teacups or mason jars. These unique containers add a personal touch to your creations. Just ensure they’re heat-safe to avoid cracking or accidents.
For non-traditional vessels, safety testing is a must. Always check if the material can withstand high temperatures. A simple test involves pouring hot wax into a small section and observing the results.
If you’re planning to sell your products, labeling regulations are crucial. Include details like the fragrance, burn time, and safety warnings. Clear labeling not only looks professional but also builds trust with customers.
- Use a container width-to-wick ratio chart for even burning.
- Preheat glass containers to prevent cracking.
- Experiment with different shapes and sizes for variety.
- Always test non-traditional vessels for heat resistance.
- Follow labeling guidelines for sale-ready products.
By choosing the right container, you can create stunning, functional pieces that stand out. Whether you’re crafting for yourself or for sale, the possibilities are endless.
Mold Magic: Silicone, Metal, and More
Unlocking the potential of molds can take your crafting to the next level. Whether you’re designing intricate shapes or branding your creations, the right type makes all the difference. Silicone options like Mold Star™ withstand up to 450°F and are skin-safe—perfect for DIY projects.

Custom logo molds are a game-changer for personalization. I’ve used liquid silicone kits to craft unique designs, like my THREE MOONS mold. For tricky demolding, freeze the mold briefly—it helps release delicate shapes without damage.
Metal molds need extra care. Preheat them slightly to avoid wax sticking. If you’re improvising, food-safe materials like baking silicone work well for small batches. Damaged silicone? A patch kit can extend its life.
- Use freezer tricks to ease intricate shapes out of molds.
- Preheat metal molds for smoother releases.
- Repair cracks in silicone with a food-safe sealant.
“My custom mold turned out even better than I imagined—crisp details every time!”
With these tips, your supplies will go further, and every project will feel polished. Experiment freely—molds are where creativity meets precision.
Safety Tips Every Candle Maker Should Know
Safety should always be your top priority when working with hot wax. Whether you’re a beginner or a seasoned crafter, these guidelines will help you avoid accidents and enjoy the process.

Fire prevention starts with your workspace. Use a double boiler to melt wax—never microwave it directly. Keep flammable items like paper towels away, and always work in a well-ventilated area. A stable surface is a must!
Your PPE checklist matters. Heat-resistant gloves protect better than oven mitts when handling hot containers. Safety goggles shield your eyes from splashes, and an apron keeps wax off clothes. Regular mitts won’t cut it.
Dispose of leftover wax safely. Let it cool completely, then scrape it into a non-flammable container. Never pour hot wax down the drain—it can clog pipes or even ignite.
Child and pet safety is critical. Store supplies out of reach, and never leave melting wax unattended. Designate a pet-free zone to avoid curious paws near hot surfaces.
- For burns: Rinse immediately with cool water for 10+ minutes.
- Keep a fire extinguisher rated for grease fires nearby.
- Label all supplies clearly to avoid mix-ups.
“Taking shortcuts with safety is never worth the risk. A few extra minutes can prevent accidents.”
With these steps, you can get started confidently. Remember, a safe workspace is the foundation of every great project!
Troubleshooting Common Candle Making Mistakes
Even experienced crafters run into challenges—here’s how to solve them. A cracked finish or faint fragrance doesn’t mean your project is ruined. With a few adjustments, you can salvage and improve your final product.

Why Is My Wax Cracking?
Cracks often stem from temperature shock. Pouring hot wax into a cold container creates stress. Preheat jars to 104°F (40°C) to prevent this. Let wax cool slightly in the pot before pouring—around 125°F for soy blends.
Humidity matters too. High moisture can cause uneven cooling. Work in a dry space or use a dehumidifier. For existing cracks, a heat gun gently melts the surface to smooth flaws.
Fixing Weak Scent Throw
Fragrance issues usually tie to time or techniques. Undercured candles won’t smell strong. Soy wax needs 1–2 weeks; paraffin requires 72 hours. Test different cure durations to find the sweet spot.
Additives like coconut wax (10–20%) boost scent retention. Always check oil compatibility—some fragrances fade in certain waxes. A simple test: blend a small batch before committing.
- Preheat containers to avoid temperature shock.
- Control humidity for even cooling.
- Use a heat gun to fix sinkholes or cracks.
- Add coconut wax to enhance scent throw.
- Test fragrance oils for compatibility.
“Patience is key. Letting candles cure fully makes all the difference in scent strength.”
Creative Candle Ideas to Try Tonight
Turn ordinary wax into extraordinary decor with these fresh ideas. Whether you’re crafting solo or hosting friends, these projects add a personal touch to any space. Let’s dive into some fun ways to elevate your creations.

Embedded object designs are a summer favorite. Try pressing seashells or dried flowers into the wax for a beachy vibe. For winter, cinnamon sticks or pinecones add cozy charm. Just ensure objects are heat-safe to avoid melting mishaps.
Marbled wax techniques turn scraps into art. Swirl leftover colored wax layers for a galaxy effect. Use a toothpick to create intricate patterns before the wax sets. It’s a zero-waste way to make each piece unique.
Cocktail-inspired layers, like mojito mint, bring refreshing scents to your home. Layer green-tinted wax with citrusy fragrances for a spa-like ambiance. Pair with a matching drink setup for a themed gift.
“Glow-in-the-dark wax was a hit at my niece’s birthday party—the kids loved it!”
Collaborative candle-making parties spark creativity. Set up stations for guests to mix scents, colors, or embedded objects. Add a photo booth with props for memorable snapshots of your DIY masterpieces.
- Use seasonal scents: apple pie for fall, peppermint for winter.
- Experiment with glow-in-the-dark wax for playful nightlights.
- Host a candle-making party with friends for a fun group activity.
With these ideas, your next project will shine—literally. Whether you’re crafting for yourself or gifting, these twists make the process as enjoyable as the final light.
Where to Buy Quality Candle Making Supplies
Your creative journey begins with sourcing the best tools. Whether you’re stocking up for personal projects or launching a small business, knowing where to shop saves time and money.
Big box stores offer convenience, but specialty suppliers like Candlewic provide higher-quality products. Their wholesale program includes 50lb wax boxes, perfect for bulk orders. Nature’s Garden and Makesy also curate beginner-friendly kits with premium materials.

Buying in bulk makes sense if you craft regularly. A 50lb wax box lasts months and reduces costs by 30–40%. Store excess in airtight containers to maintain freshness.
Starter kits under $75 are ideal for newcomers. Look for these essentials:
- Soy wax (2–5 lbs)
- Cotton or zinc wicks
- 3–5 fragrance oil samples
- Heat-resistant containers
Local suppliers often stock unique items. Search by state for nearby shops—many offer hands-on tutorials too. Fragrance sample programs let you test scents before committing to large bottles.
“Candlewic’s wholesale prices helped me launch my Etsy shop without breaking the bank!”
With these tips, you’ll build a reliable supply chain for endless creativity. Happy crafting!
Light Up Your Life with Handmade Candles
Handcrafted creations bring warmth and personality to any space. What starts as a hobby can bloom into a thriving side hustle—many crafters turn their passion into profit with just a few supplies and creativity.
Eco-conscious choices matter too. Beeswax cuts carbon emissions by 50% compared to paraffin. Pair sustainable wax with reusable containers for gifts that delight and protect the planet.
Include care cards with tips like trimming wicks to 1/4 inch. Seasonal rotations keep things fresh—try peppermint for winter or citrus for summer. Fragrance swaps make year-round crafting exciting.
“Let us help you create perfect candles today!” — Candlewic Community
Ready to learn make something beautiful? Your journey starts now.
FAQ
What supplies do I need to get started?
How do I choose the right wax?
What’s the difference between fragrance oils and essential oils?
How do I prevent my wax from cracking?
Can I reuse old jars for container candles?
Where can I buy quality supplies?
How do I fix a weak scent throw?
Are there safety tips I should follow?
Future Wedding Plans: Tips and Inspiration
Butterfly Haircut: The Stylish Cut That’s Taking the US by Storm